Sensors
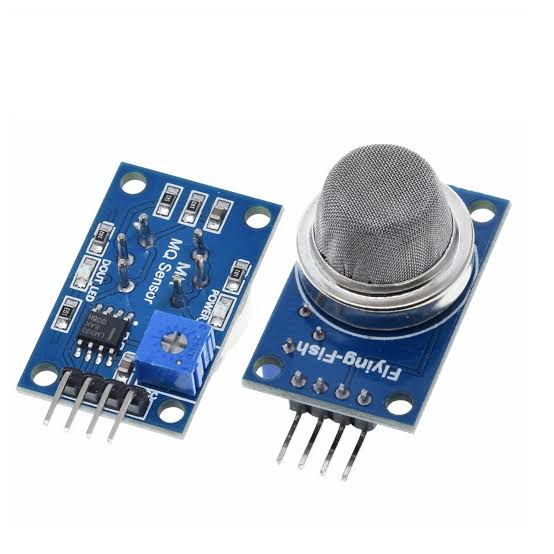
MQ2 Gas / Smoke Sensor
৳170
Detects LPG, methane, propane, hydrogen and smoke from roughly 300 to 10000 ppm, with an analog level and an adjustable digital trigger.
The most widely used gas sensor in hobby projects, and the natural choice for a kitchen leak alarm in a country where LPG cylinders are standard. Needs burning in before the readings mean anything.
What you can build
- LPG cylinder leak alarms for the kitchen
- Smoke detection and early fire warning
- Gas level logging with an alert over SMS or WiFi
Not sure it will work? Test your circuit free in Tekko Sim — on your phone, in Bangla or English.
| Category | Sensors |
| Model no. | MQ2 |
| Availability | In stock |
| In stock | 4 pcs |
| Delivery | Cash on Delivery, nationwide Bangladesh |
| Detects | LPG, propane, methane, hydrogen, alcohol and smoke |
| Detection Range | roughly 300–10000 ppm |
| Operating Voltage | 5V DC |
| Heater Current | roughly 150 mA |
| Outputs | analog level plus an adjustable digital trigger |
| Comparator | LM393 with an onboard potentiometer |
| Warm-up | about 20 seconds before it responds |
| Burn-in | 24 to 48 hours powered before readings are stable |
Questions about the MQ2 Gas / Smoke Sensor
How do I calibrate the MQ2?
Burn it in first by leaving it powered for 24 to 48 hours. Then, in clean air, read the analog value and use it as your baseline — the datasheet curve converts the ratio against that baseline into ppm. For an alarm you often do not need ppm at all: set the digital threshold with the potentiometer so it triggers just above the clean-air level.
Why is the sensor warm to the touch?
That is normal. The MQ2 has an internal heater that must reach temperature for the gas-sensitive layer to work, and it draws around 150 mA continuously. A sensor that stays cold is not powered correctly.
Can it tell one gas from another?
No. It responds to several combustible gases at once and reports a single combined level. If you need to identify a specific gas, use a sensor built for it.
MQ2 সেন্সরটি ব্যবহারের সময় Arduino বোর্ড বারবার রিস্টার্ট হচ্ছে কেন ?
MQ2 সেন্সরের ভেতরে থাকা হিটিং এলিমেন্টটি কাজ করার সময় প্রচুর কারেন্ট (প্রায় ১৫০-২০০ mA) টানে। যদি আপনার পাওয়ার সোর্স দুর্বল হয়, তবে ভোল্টেজ ড্রপ হয়ে বোর্ড রিস্টার্ট হতে পারে। সমাধান হিসেবে আমরা সেন্সরের জন্য একটি আলাদা ৫ ভোল্টের শক্তিশালী পাওয়ার সাপ্লাই লাগাবো এবং অবশ্যই Arduino-র গ্রাউন্ডের সাথে সেন্সরের গ্রাউন্ড কমন রাখব।
ধোঁয়া বা গ্যাস শনাক্ত করার জন্য সেন্সরটি Arduino-র সাথে কীভাবে সঠিকভাবে লাগাবো ?
সেন্সরের VCC পিন 5V-এ এবং GND পিন গ্রাউন্ডে যুক্ত করুন। গ্যাসের ঘনত্ব বা এনালগ ভ্যালু রিড করার জন্য AO (Analog Output) পিনটি Arduino-র A0 পিনে সংযোগ করুন। আর যদি শুধু ধোঁয়া বা গ্যাস থাকলে একটি সংকেত পেতে চান, তবে DO (Digital Output) পিনটি যেকোনো ডিজিটাল পিনে লাগাবো । সংযোগ দেওয়ার পর সেন্সরের পাওয়ার LED টি জ্বলেছে কিনা তা নিশ্চিত করুন।
সেন্সরটি চালু করার সাথে সাথেই ভুল রিডিং দিচ্ছে বা অটোমেটিক অ্যালার্ম বাজছে কেন ?
MQ2 সেন্সর পাওয়ার দেওয়ার পর এর ভেতরের হিটারটি নির্দিষ্ট তাপমাত্রায় পৌঁছাতে অন্তত ৬০-৯০ সেকেন্ড সময় নেয় (যাকে Warm-up time বলা হয়)। এই সময়ের মধ্যে রিডিং অত্যন্ত অস্থির থাকে। সেন্সরটি কীভাবে কাজ করছে তা দেখার জন্য সিরিয়াল মনিটরে ডেটা পর্যবেক্ষণ করুন এবং ভ্যালু স্থিতিশীল না হওয়া পর্যন্ত অপেক্ষা করুন। প্রথমবার ব্যবহারের ক্ষেত্রে সেন্সরটি অন্তত ২৪ ঘণ্টা চালু রাখা উচিত।
গ্যাসের নির্দিষ্ট ঘনত্বে অ্যালার্ম বাজানোর জন্য ডিজিটাল পিনটি কীভাবে ব্যবহার করব?
সেন্সরের পেছনে থাকা ছোট নীল রঙের পটেনশিওমিটারটি (Trimpot) ঘুরিয়ে আপনি সেন্সিটিভিটি নিয়ন্ত্রণ করতে পারেন। প্রথমে সাধারণ বাতাসে থাকা অবস্থায় নবটি এমনভাবে ঘোরাবো যাতে এর ডিজিটাল আউটপুট LED-টি ঠিক নিভে যাওয়ার অবস্থায় থাকে। এখন সামান্য গ্যাস বা ধোঁয়া পেলেই সেন্সরটি ট্রিগার করবে। প্রজেক্টে সতর্কবার্তা পাওয়ার জন্য আমরা একটি বাজার (Buzzer) ডিজিটাল আউটপুট পিনে লাগাবো ।
More in Sensors
All sensors →