বুস্ট সোলার ল্যাবSolar Boost Converter Arduino Lab
সোলার প্যানেল থেকে MT3608 বুস্ট কনভার্টার (স্ক্রুতে 9 V); voltage sensor আর ACS712 আউটপুট মাপে, LCD তে volts, amps আর watts ওঠে। রোদ কমিয়ে প্যানেল 3 V এর নিচে নামালে 9 V রেল মরে যায় — এটাই কনভার্টারের undervoltage lockout।
A solar panel feeds an MT3608 boost converter set to 9 V; a voltage sensor and an ACS712 meter its output into a 470 ohm load while the LCD shows volts, amps and watts. Dim the sun until the panel sags below the 3 V input gate and the whole 9 V rail dies — the converter's undervoltage lockout.
সার্কিট ডায়াগ্রাম · Circuit diagram
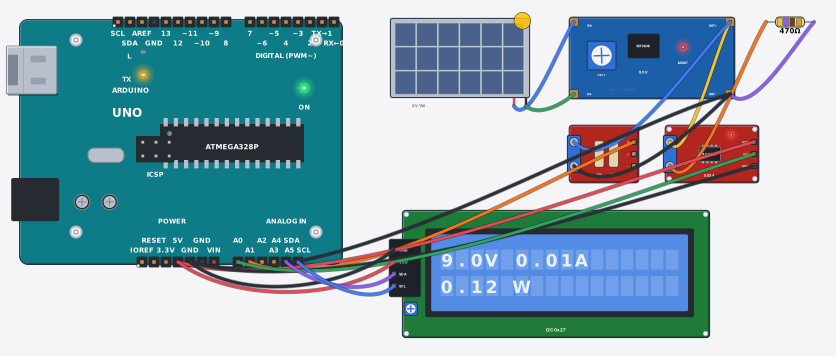
যা যা লাগবে · Parts you need
- 1 × Arduino Uno R3 Arduino Uno
- 1 × Solar panel (6 V) সোলার প্যানেল (6 V)
- 1 × Boost converter (MT3608/XL6009/LM2577) বুস্ট কনভার্টার (MT3608/XL6009/LM2577)
- 1 × Resistor 470Ω Resistor
- 1 × Voltage sensor (0–25 V) ভোল্টেজ সেন্সর (0–25 V)
- 1 × Current sensor (ACS712) কারেন্ট সেন্সর (ACS712)
- 1 × LCD 16x2 with I2C LCD ১৬x২ (I2C)
- 16 × Jumper wires জাম্পার তার
তার লাগানো · Wiring
| Solar panel (6 V) + | → | Boost converter (MT3608/XL6009/LM2577) IN+ |
| Solar panel (6 V) - | → | Boost converter (MT3608/XL6009/LM2577) IN- |
| Boost converter (MT3608/XL6009/LM2577) OUT+ | → | Current sensor (ACS712) IP+ |
| Current sensor (ACS712) IP- | → | Resistor a |
| Resistor b | → | Boost converter (MT3608/XL6009/LM2577) OUT- |
| Boost converter (MT3608/XL6009/LM2577) OUT+ | → | Voltage sensor (0–25 V) VCC |
| Boost converter (MT3608/XL6009/LM2577) OUT- | → | Voltage sensor (0–25 V) GND |
| Boost converter (MT3608/XL6009/LM2577) OUT- | → | Arduino Uno R3 GND |
| Voltage sensor (0–25 V) S | → | Arduino Uno R3 A1 |
| Current sensor (ACS712) VCC | → | Arduino Uno R3 5V |
| Current sensor (ACS712) GND | → | Arduino Uno R3 GND |
| Current sensor (ACS712) OUT | → | Arduino Uno R3 A0 |
| LCD 16x2 with I2C VCC | → | Arduino Uno R3 5V |
| LCD 16x2 with I2C GND | → | Arduino Uno R3 GND |
| LCD 16x2 with I2C SDA | → | Arduino Uno R3 A4 |
| LCD 16x2 with I2C SCL | → | Arduino Uno R3 A5 |
Code (Arduino C++)
#include <Wire.h>
#include <LiquidCrystal_I2C.h>
// Boost solar lab: the panel feeds an MT3608 boost converter (screw set to 9 V),
// and the lab instruments sit on its output — the voltage sensor divides by 5
// (A1), the ACS712 sits IN SERIES with the 470 ohm load (2.5 V at zero current,
// 185 mV per amp on the 5 A model). Panel minus and Arduino GND are joined —
// no common ground, no reading. Power = V x I. The boost only starts once
// its input reaches 3 V: dim the sun until the panel sags below that and the
// 9 V rail, the amps and the watts all go to zero — that is the converter's
// undervoltage lockout, the same reason a dead battery will not run a boost.
LiquidCrystal_I2C lcd(0x27, 16, 2);
const float ACS_SENS = 0.185;    // V per A for the 5 A model (20 A = 0.100, 30 A = 0.066)

void setup() {
  lcd.init();
  lcd.backlight();
  Serial.begin(9600);
}

void loop() {
  float volts = analogRead(A1) * (5.0 / 1023.0) * 5.0;             // sensor divides by 5
  float amps  = (analogRead(A0) * (5.0 / 1023.0) - 2.5) / ACS_SENS;
  if (amps < 0) amps = -amps;                                      // DC: direction does not matter
  float watts = volts * amps;
  lcd.setCursor(0, 0);
  lcd.print(volts, 1); lcd.print("V "); lcd.print(amps, 2); lcd.print("A  ");
  lcd.setCursor(0, 1);
  lcd.print(watts, 2); lcd.print(" W        ");
  Serial.print("V="); Serial.print(volts, 1);
  Serial.print(" I="); Serial.print(amps, 3);
  Serial.print(" P="); Serial.print(watts, 2); Serial.println(" W");
  delay(300);
}