ইনফ্রাপালস — ESP32 দিয়ে ব্রিজের স্ট্রেন ও কম্পন মনিটরInfraPulse
InfraPulse ব্রিজের নাড়ি চেনে — strain gauge মাপে ভার, MPU6050 মাপে কম্পন, আর ESP32 দুটো মিলিয়ে OLED তে একটা রায় দেখায়। বিপদ হলে বাতি আর বাজনা দুটোই চালু হয়ে যায়।
InfraPulse watches a bridge span the way a doctor watches a pulse: the strain gauge reports load, the MPU6050 reports shaking, and the ESP32 boils both down to one risk word on the OLED — with a beacon and a buzzer when it says DANGER.
সার্কিট ডায়াগ্রাম · Circuit diagram
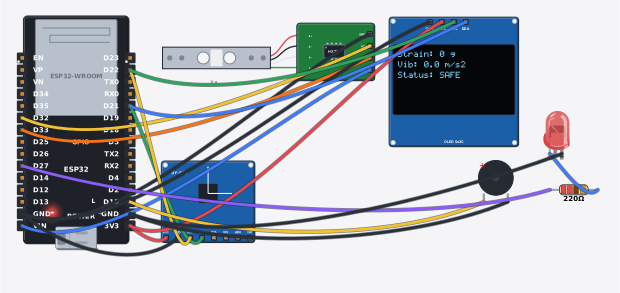
যা যা লাগবে · Parts you need
- 1 × ESP32 DevKit V1 (WROOM-32) ESP32 DevKit V1 (WROOM-32)
- 1 × Load cell + HX711 (weight) লোড সেল + HX711 (ওজন)
- 1 × Motion sensor MPU6050 (GY-521) মোশন সেন্সর MPU6050 (GY-521)
- 1 × OLED display 0.96" (SSD1306) OLED ডিসপ্লে ০.৯৬" (SSD1306)
- 1 × Buzzer (5 V) Buzzer (বাঁশি, 5 V)
- 1 × Resistor 220Ω Resistor
- 1 × LED (red) LED বাতি
- 17 × Jumper wires জাম্পার তার
তার লাগানো · Wiring
| Load cell + HX711 (weight) VCC | → | ESP32 DevKit V1 (WROOM-32) VIN |
| Load cell + HX711 (weight) GND | → | ESP32 DevKit V1 (WROOM-32) GND |
| Load cell + HX711 (weight) DT | → | ESP32 DevKit V1 (WROOM-32) D32 |
| Load cell + HX711 (weight) SCK | → | ESP32 DevKit V1 (WROOM-32) D33 |
| Motion sensor MPU6050 (GY-521) VCC | → | ESP32 DevKit V1 (WROOM-32) 3V3 |
| Motion sensor MPU6050 (GY-521) GND | → | ESP32 DevKit V1 (WROOM-32) GND |
| Motion sensor MPU6050 (GY-521) SDA | → | ESP32 DevKit V1 (WROOM-32) D21 |
| Motion sensor MPU6050 (GY-521) SCL | → | ESP32 DevKit V1 (WROOM-32) D22 |
| OLED display 0.96" (SSD1306) VCC | → | ESP32 DevKit V1 (WROOM-32) 3V3 |
| OLED display 0.96" (SSD1306) GND | → | ESP32 DevKit V1 (WROOM-32) GND |
| OLED display 0.96" (SSD1306) SDA | → | ESP32 DevKit V1 (WROOM-32) D21 |
| OLED display 0.96" (SSD1306) SCL | → | ESP32 DevKit V1 (WROOM-32) D22 |
| Buzzer (5 V) + | → | ESP32 DevKit V1 (WROOM-32) D15 |
| Buzzer (5 V) - | → | ESP32 DevKit V1 (WROOM-32) GND.2 |
| ESP32 DevKit V1 (WROOM-32) D27 | → | Resistor a |
| Resistor b | → | LED A |
| LED K | → | ESP32 DevKit V1 (WROOM-32) GND.2 |
Code (Arduino C++)
#include <Wire.h>
#include <HX711.h>
#include <Adafruit_MPU6050.h>
#include <Adafruit_Sensor.h>
#include <Adafruit_GFX.h>
#include <Adafruit_SSD1306.h>
// InfraPulse: structural health monitoring for a bridge span or a rooftop slab.
// The strain gauge (Wheatstone bridge) talks through the HX711; the MPU6050
// watches vibration. Both feed one risk score: SAFE / WATCH / DANGER on the
// OLED, with a red beacon and a buzzer at DANGER. The real kit also carries a
// DS18B20 for temperature compensation — the simulator focuses on the two
// channels that move first when a structure is in trouble.
HX711 loadCell;
Adafruit_MPU6050 mpu;
Adafruit_SSD1306 display(128, 32, &Wire, -1);

void setup() {
  Serial.begin(115200);
  pinMode(15, OUTPUT); pinMode(27, OUTPUT);
  loadCell.begin(32, 33);            // DT -> D32, SCK -> D33
  loadCell.set_scale(420);           // calibration: counts per gram for your gauge
  loadCell.tare();                   // zero with the structure at rest
  if (!mpu.begin()) { Serial.println("MPU6050 not found"); while (1) delay(10); }
  mpu.setAccelerometerRange(MPU6050_RANGE_8_G);
  display.begin(SSD1306_SWITCHCAPVCC, 0x3C);
  display.setTextSize(1);
  display.setTextColor(SSD1306_WHITE);
}

void loop() {
  float strain = loadCell.get_units(1);              // grams on the gauge
  sensors_event_t a, g, temp;
  mpu.getEvent(&a, &g, &temp);
  float vib = fabs(a.acceleration.z - 9.81);         // how far gravity moved
  String status = "SAFE";
  if (strain > 2000 || vib > 1.5) status = "DANGER";
  else if (strain > 1000 || vib > 0.8) status = "WATCH";
  bool danger = status == "DANGER";
  digitalWrite(15, danger ? HIGH : LOW);
  digitalWrite(27, danger ? HIGH : LOW);
  display.clearDisplay();
  display.setCursor(0, 0);  display.print("Strain: "); display.print(strain, 0); display.print(" g");
  display.setCursor(0, 12); display.print("Vib: "); display.print(vib, 1); display.print(" m/s2");
  display.setCursor(0, 24); display.print("Status: "); display.print(status);
  display.display();
  Serial.print("Strain: "); Serial.print(strain, 0); Serial.print(" g | Vib: ");
  Serial.print(vib, 2); Serial.print(" m/s2 | Status: "); Serial.println(status);
  delay(400);
}
আরো project · More projects
- ওষুধের রিমাইন্ডার ঘড়ি — DS3231 আর দুটো নব দিয়েMedicine reminder clock (DS3231 + two knobs)
- ডিম ফোটানোর থার্মোস্ট্যাট — তাপমাত্রা নিজে নিজে ঠিক থাকেEgg incubator thermostat (holds 37.5 C by itself)
- বায়ুচাপ দেখে উচ্চতা মাপার যন্ত্র — ওঠার সময় বিপ বাজেBarometric altimeter with a climb beeper (BMP280)
- সোনার হ্যাপটিক বেল্ট — বাধা কাছে হলে কম্পন বাড়েSonic haptic belt (vibration grows near obstacles)