সোলার ট্র্যাকার: প্যানেল রোদের দিকে ঘোরেSolar Tracker with Arduino
প্যানেলের দুই পাশে দুইটা LDR, মাঝে পাতা-জাতীয় ছায়া দেওয়া। যে পাশে রোদ কম, সে পাশের পড়া কমে — servo সেদিকে ধীরে ঘোরে, দুই পাশ সমান হলে থামে — তখন প্যানেল রোদের মুখোমুখি। Voltage sensor দেখায় ঘোরার সময় প্যানেল কত watt দিচ্ছে।
Two LDRs sit on either side of a fin on the panel. The shaded one reads lower, and the servo steps toward the brighter side until both agree — the panel is then square to the sun. The voltage sensor over a 47 ohm load shows what the panel actually produces as it turns.
সার্কিট ডায়াগ্রাম · Circuit diagram
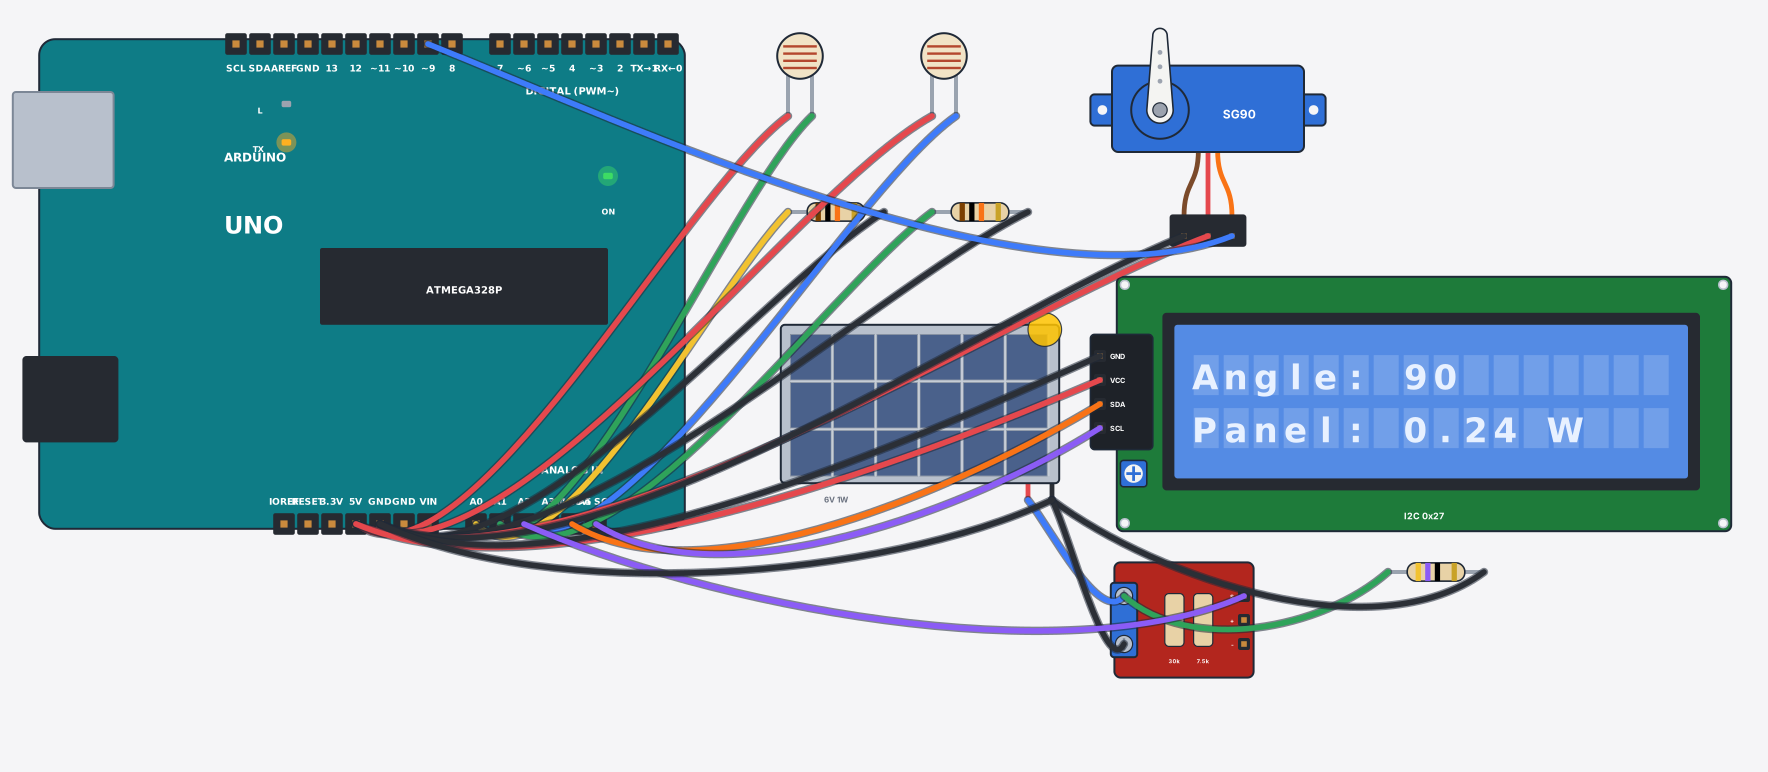
যা যা লাগবে · Parts you need
- 1 × Arduino Uno Arduino Uno
- 2 × Light sensor (LDR) আলো সেন্সর (LDR)
- 2 × Resistor 10000Ω Resistor
- 1 × Servo motor (SG90) সার্ভো মোটর (SG90)
- 1 × LCD 16x2 with I2C LCD ১৬x২ (I2C)
- 1 × Solar panel (6 V) সোলার প্যানেল (6 V)
- 1 × Voltage sensor (0–25 V) ভোল্টেজ সেন্সর (0–25 V)
- 1 × Resistor 47Ω Resistor
- 21 × Jumper wires জাম্পার তার
তার লাগানো · Wiring
| Arduino Uno 5V | → | Light sensor (LDR) a |
| Light sensor (LDR) b | → | Arduino Uno A0 |
| Arduino Uno A0 | → | Resistor a |
| Resistor b | → | Arduino Uno GND |
| Arduino Uno 5V | → | Light sensor (LDR) a |
| Light sensor (LDR) b | → | Arduino Uno A1 |
| Arduino Uno A1 | → | Resistor a |
| Resistor b | → | Arduino Uno GND |
| Servo motor (SG90) VCC | → | Arduino Uno 5V |
| Servo motor (SG90) GND | → | Arduino Uno GND |
| Servo motor (SG90) SIG | → | Arduino Uno D9 |
| LCD 16x2 with I2C VCC | → | Arduino Uno 5V |
| LCD 16x2 with I2C GND | → | Arduino Uno GND |
| LCD 16x2 with I2C SDA | → | Arduino Uno A4 |
| LCD 16x2 with I2C SCL | → | Arduino Uno A5 |
| Solar panel (6 V) + | → | Voltage sensor (0–25 V) VCC |
| Voltage sensor (0–25 V) VCC | → | Resistor a |
| Resistor b | → | Solar panel (6 V) - |
| Voltage sensor (0–25 V) GND | → | Solar panel (6 V) - |
| Voltage sensor (0–25 V) S | → | Arduino Uno A2 |
| Solar panel (6 V) - | → | Arduino Uno GND |
Code (Arduino C++)
#include <Wire.h>
#include <LiquidCrystal_I2C.h>
#include <Servo.h>
// Sun tracker: two LDRs sit on either side of the panel behind a small fin, so the
// shaded one reads lower. Whichever side is brighter, the servo steps that way
// until both read about the same — the panel is then square to the sun. The
// voltage sensor measures the panel's output over a 47 ohm load so you can watch
// the watts while the panel turns.
Servo tilt;
LiquidCrystal_I2C lcd(0x27, 16, 2);

void setup() {
  tilt.attach(9);
  tilt.write(90);
  lcd.init();
  lcd.backlight();
  Serial.begin(9600);
}

void loop() {
  int left = analogRead(A0), right = analogRead(A1);
  int diff = left - right;
  if (diff > 12 && tilt.read() > 2) tilt.write(tilt.read() - 2);
  else if (diff < -12 && tilt.read() < 178) tilt.write(tilt.read() + 2);

  float v = analogRead(A2) * (5.0 / 1023.0) * 5.0;   // the sensor divides by 5
  float watts = v * v / 47.0;                         // P = V^2 / R over the 47 ohm load

  lcd.setCursor(0, 0); lcd.print("Angle: "); lcd.print(tilt.read()); lcd.print("   ");
  lcd.setCursor(0, 1); lcd.print("Panel: "); lcd.print(watts, 2); lcd.print(" W ");
  Serial.print("angle="); Serial.print(tilt.read());
  Serial.print(" panel="); Serial.print(watts, 2); Serial.println(" W");
  delay(60);
}
আরো project · More projects
- দুমুখো ভিজিটর কাউন্টার (LCD তে ঢোকা-বের হওয়া)Bidirectional visitor counter (in/out on LCD)
- ক্ল্যাপ সুইচ: হাততালি দিলেই বাতি অন-অফClap switch: one clap toggles the lamp
- MOSFET দিয়ে DC মোটরের গতি নিয়ন্ত্রণ (PWM)DC motor speed control with a MOSFET (PWM)
- স্মার্ট পার্কিং: কোন স্লট খালি তার হিসাবSmart parking: free-slot counter per floor